
S10 Project Update!
S10 Projects website is finally getting an update!

1987 LT1 S10 Build
Build Updates, New Parts, And Current Progress!

1992 Typhoon #440
Newest addition, Needs lots of work!

1988 6.0l Turbo Tyclone
Future project, collecting parts for the build.

Featured
Featured Content.
Showing posts with label 1st gen. Show all posts
Showing posts with label 1st gen. Show all posts
Saturday, June 1, 2013

Freshly painted tonneau and black rims

First burnouts with the caltracs on
After i got the LT1 swap done and started having some fun on the street i noticed that i would get bad wheel hop all the time. I ordered a set of Calvert Caltracks to help with the wheel hop.
 |
| Calvert Caltracks |
After I got the Caltracks installed i went for a quick test down the street. Here's a picture or the results. I set the Caltracks to 0 pre-load and that was enough to eliminate all of the wheel hop!
 |
| Laying some rubber down! |
First door panel installed
I installed the passenger door panel which was re covered and has a set of Jl c2-650's. I made a How To for recovering the door panels upper and lower sections. If your interested in how i did it please follow the links below
How To, Custom Door Panels Part 1
How To, Custom Door Panels Part 2
How To, Custom Door Panels Part 1
How To, Custom Door Panels Part 2
 |
| Custom Door Panel With Jl c2-650 Speakers |
Caltracs installed
I got the Calvert Caltracs installed on my truck this weekend. Took about and hour and a half to drop the rear end and get all the hardware installed. The instructions provided were very clear and made installation easy.
 |
| Caltracks Installed |
Friday, April 27, 2012
OLD Current Project Upgrade: How To, Custom Door Panels Part 2
Credit goes to rhenry01 on s10forum
 We will start part 2 by re covering the upper cloth part by the window. This fabric should come off easily. Take care not to destroy the padding underneath the fabric as we will leave is on and just add more foam to it. Also take care not to seperate the cardboard portion of the panel from the metal portion. If that happens try some 5 min epoxy to glue them back together.
 We will start part 2 by re covering the upper cloth part by the window. This fabric should come off easily. Take care not to destroy the padding underneath the fabric as we will leave is on and just add more foam to it. Also take care not to seperate the cardboard portion of the panel from the metal portion. If that happens try some 5 min epoxy to glue them back together.
Thursday, April 26, 2012
OLD Current Project Upgrade: How To, Custom Door Panels Part 1
Credit goes to rhenry01 on s10forum
 OK First Gen'ers, when I bought my truck
used there was an unidentifiable substance in the bottom of the map
pockets that had successfully chemically bonded some pennies to the
bottom of the pockets. Since they have that fuzzy stuff on them cleaning
them was almost out of the question. Besides, my wife think that they
make excellent junk collectors! Well I'm doing away with the pockets and
I'm going to be doing it as inexpensively as possible. I am going to be
taking lots of pictures so I'll post them here so you all can follow
along. This is interactive so if you have any questions or comments,
fire away.
OK First Gen'ers, when I bought my truck
used there was an unidentifiable substance in the bottom of the map
pockets that had successfully chemically bonded some pennies to the
bottom of the pockets. Since they have that fuzzy stuff on them cleaning
them was almost out of the question. Besides, my wife think that they
make excellent junk collectors! Well I'm doing away with the pockets and
I'm going to be doing it as inexpensively as possible. I am going to be
taking lots of pictures so I'll post them here so you all can follow
along. This is interactive so if you have any questions or comments,
fire away.
 OK First Gen'ers, when I bought my truck
used there was an unidentifiable substance in the bottom of the map
pockets that had successfully chemically bonded some pennies to the
bottom of the pockets. Since they have that fuzzy stuff on them cleaning
them was almost out of the question. Besides, my wife think that they
make excellent junk collectors! Well I'm doing away with the pockets and
I'm going to be doing it as inexpensively as possible. I am going to be
taking lots of pictures so I'll post them here so you all can follow
along. This is interactive so if you have any questions or comments,
fire away.
OK First Gen'ers, when I bought my truck
used there was an unidentifiable substance in the bottom of the map
pockets that had successfully chemically bonded some pennies to the
bottom of the pockets. Since they have that fuzzy stuff on them cleaning
them was almost out of the question. Besides, my wife think that they
make excellent junk collectors! Well I'm doing away with the pockets and
I'm going to be doing it as inexpensively as possible. I am going to be
taking lots of pictures so I'll post them here so you all can follow
along. This is interactive so if you have any questions or comments,
fire away.Tuesday, April 24, 2012
Current Project Update: Tubular Upper Control Arm's on the cheap, Header Clearance
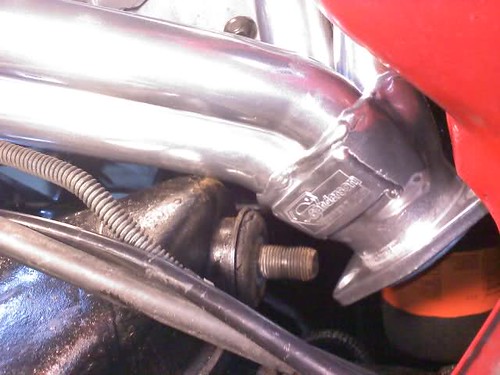
I solved this issue by ordering a set of tubular upper control arms from http://www.gbodyparts.com . Its very useful to know that almost all front suspension parts from a G Body car will fit onto our s10's.
Sunday, October 31, 2010
How to: Cavalier seat swap 1982-2000+
Another very popular mod is to put cavalier seats
into your s10 instead of the original bench or buckets. The main reason for doing this is that the seats sit a little lower giving you more head room, as well as being more comfortable then the stock seats.
If you have stock bucket seats or a 60/40 (split) bench seat, you can use those seat tracks to put on your Cavalier seats. If you have a full bench seat, I believe you will have to go out and find some bucket or 60/40 seat tracks in order for this to work properly
You can get this style seat from any newer Chevy Cavalier or Pontiac Sunfire. They have various colors/prints available. Just go check out your local junkyard. Getting them from a 2-door is best because they have the tab in the back so you can tilt the seat forward so you can have access to behind the seats. Camaro seats also work for this swap.
Step 1: Remove the Seat Tracks from your Cavalier seats. There should only be four bolts one in each corner of the seat. These tracks are no longer needed so you can toss them away or do what ever you like with them.
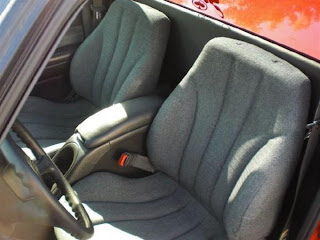 |
| Cavalier seats installed. |
If you have stock bucket seats or a 60/40 (split) bench seat, you can use those seat tracks to put on your Cavalier seats. If you have a full bench seat, I believe you will have to go out and find some bucket or 60/40 seat tracks in order for this to work properly
You can get this style seat from any newer Chevy Cavalier or Pontiac Sunfire. They have various colors/prints available. Just go check out your local junkyard. Getting them from a 2-door is best because they have the tab in the back so you can tilt the seat forward so you can have access to behind the seats. Camaro seats also work for this swap.
Step 1: Remove the Seat Tracks from your Cavalier seats. There should only be four bolts one in each corner of the seat. These tracks are no longer needed so you can toss them away or do what ever you like with them.
Saturday, October 30, 2010
My First Mod. Upgrading to a One Piece Grill
 Headlight Relocator Mounting Kit for late-model 1st gen. grill installation onto early model ac core
Alot of people and websites and car dealers etc etc will tell you that you either need a new core support or a "Headlight relocator kit" in order to install the newer first generation 'one-piece grill' in place of the original 3 piece. The kit is about as useful as a pet rock. It costs upwards of $50-$60 and the only things you need in it are the 2 pieces of sheet metal that actually mount your lights in a different spot, and 4 extra headlight mounting screws. They package Toyota headlight bezels that are weak as hell that are the same size as your existing ones, and springs that just bend the aluminum foil bezels. Lucky i found a website that is selling just the brackets and are made of good quality and are on sale for 4$. Relocating Brackets


