S10 Project Update!

S10 Projects website is finally getting an update!

1987 LT1 S10 Build

Build Updates, New Parts, And Current Progress!

1992 Typhoon #440

Newest addition, Needs lots of work!

1988 6.0l Turbo Tyclone

Future project, collecting parts for the build.

Featured

Featured Content.

Sunday, October 31, 2010

All of my s10 Mod's to date

Last week I disassembled the entire rotating assembly to see what kind of wear was on main bearings and rod bearings. When I purchased this motor i was told that it was rebuilt 150,000km ago and i had no idea what kind of condition the motor was in. Turns out that the motor had normal wear and didn't need to be rebuilt. How ever as i had never rebuilt a motor before I decided that i would rebuild and learn something along the way. This will also give me a chance to build it up a little bit more and get some more horse power.

How to: Cavalier seat swap 1982-2000+

Another very popular mod is to put cavalier seats
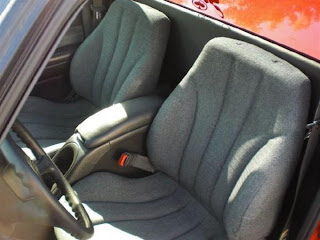
S10 Cavalier Seat
Cavalier seats installed.
into your s10 instead of the original bench or buckets. The main reason for doing this is that the seats sit a little lower giving you more head room, as well as being more comfortable then the stock seats.

 If you have stock bucket seats or a 60/40 (split) bench seat, you can use those seat tracks to put on your Cavalier seats. If you have a full bench seat, I believe you will have to go out and find some bucket or 60/40 seat tracks in order for this to work properly

You can get this style seat from any newer Chevy Cavalier or Pontiac Sunfire. They have various colors/prints available. Just go check out your local junkyard. Getting them from a 2-door is best because they have the tab in the back so you can tilt the seat forward so you can have access to behind the seats. Camaro seats also work for this swap.

Step 1: Remove the Seat Tracks from your Cavalier seats. There should only be four bolts one in each corner of the seat. These tracks are no longer needed so you can toss them away or do what ever you like with them.

Saturday, October 30, 2010

My First Mod. Upgrading to a One Piece Grill

Headlight Relocator Mounting Kit for late-model 1st gen. grill installation onto early model ac core

Alot of people and websites and car dealers etc etc will tell you that you either need a new core support or a "Headlight relocator kit" in order to install the newer first generation 'one-piece grill' in place of the original 3 piece. The kit is about as useful as a pet rock. It costs upwards of $50-$60 and the only things you need in it are the 2 pieces of sheet metal that actually mount your lights in a different spot, and 4 extra headlight mounting screws. They package Toyota headlight bezels that are weak as hell that are the same size as your existing ones, and springs that just bend the aluminum foil bezels. Lucky i found a website that is selling just the brackets and are made of good quality and are on sale for 4$. Relocating Brackets

The Beginning

My S10 in Blue
So this is my first post and i will be starting at the beginning of my project. This truck was originally my brother's until i purchased it from him for 1500$. I was 18 when i purchased this truck and it was my very first vehicle. When i purchased it there was no rear end as my brother had removed it for his new truck. This left me with a truck sitting on blocks that wasn't drive able. So the first thing i did was go to the junkyard and find a rear end that would fit. I ended up finding a 3.08 limited slip rear end and have been using it since. I drove the truck the way it currently looked for one summer and winter. After the winter the body on the truck was toast. There were holes in the floor and the cab corners and rockers were rusted out so i decided to take it upon myself to rebuild the truck. Since then i have done a lot of modifications to make this truck mine and to make it unique.